GitHub仓库:xxbaizero0/game_2048: Flutter game (github.com)

AspectRatio参考文章

GridView参考文章Flutter网格型布局 - GridView篇 - 掘金 (juejin.cn)

GestureDetector参考文章 Flutter 手势系列教程—GestureDetector - 掘金 (juejin.cn)

shared_preferences参考文章 Flutter shared_preferences的基本使用、源码分析、封装 - 掘金 (juejin.cn)

privide参考文章

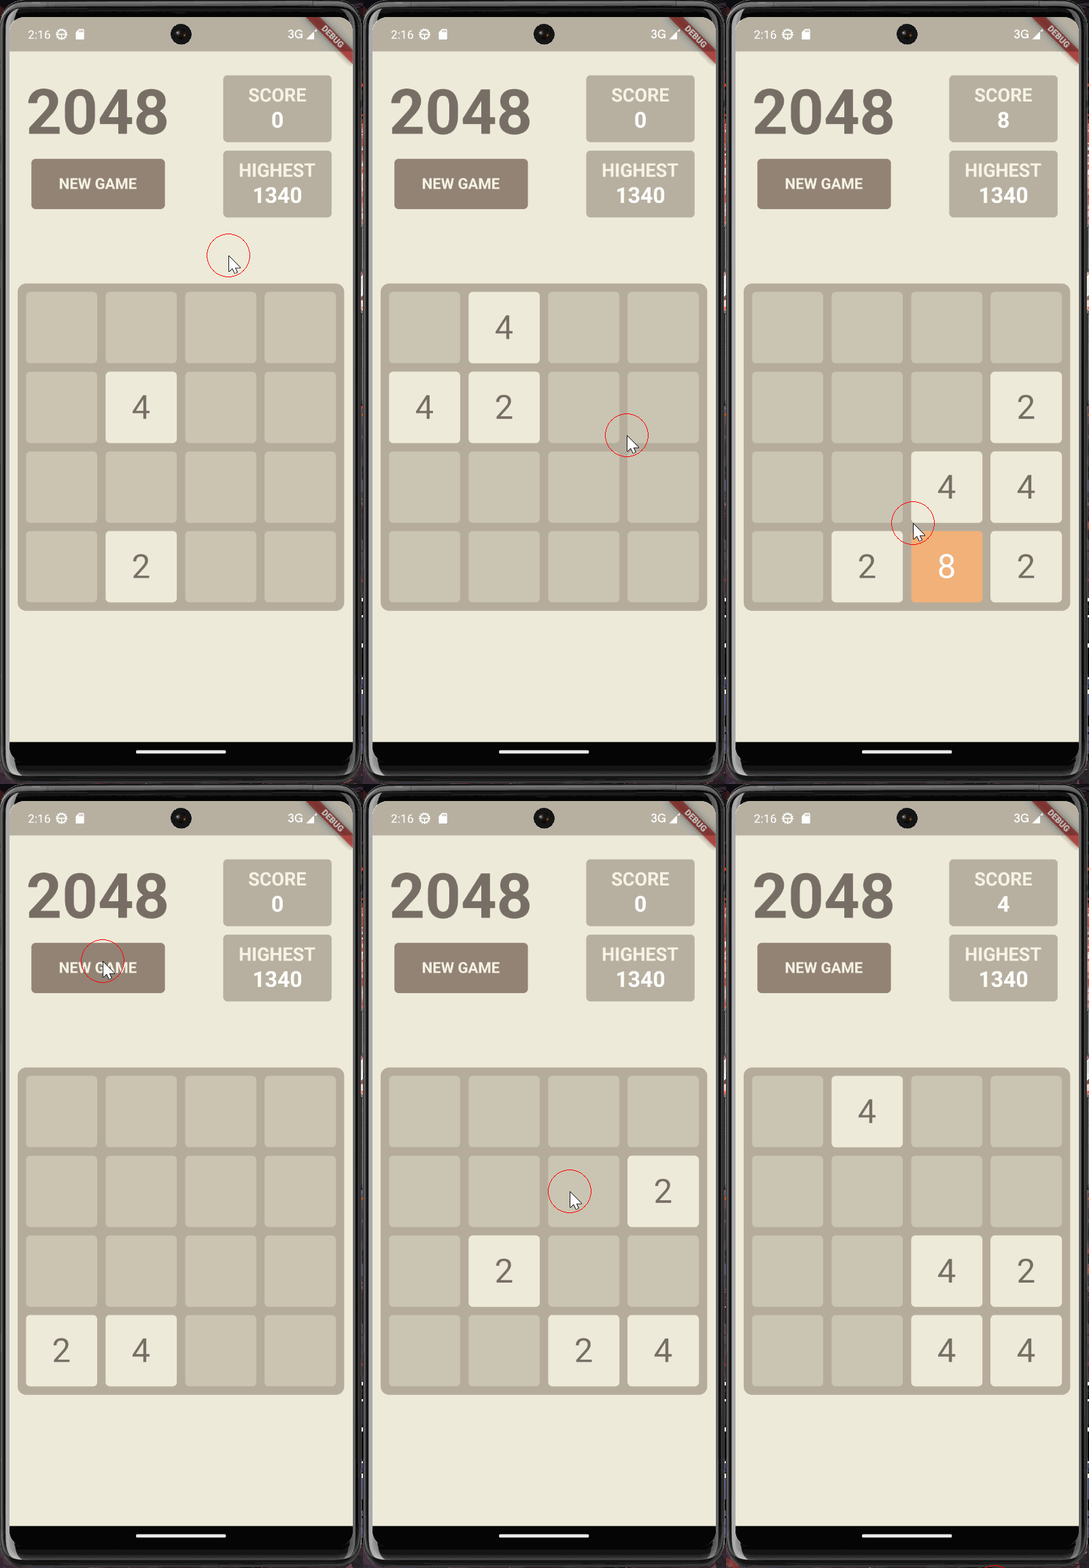
预览

2024-03-14-22-16-04

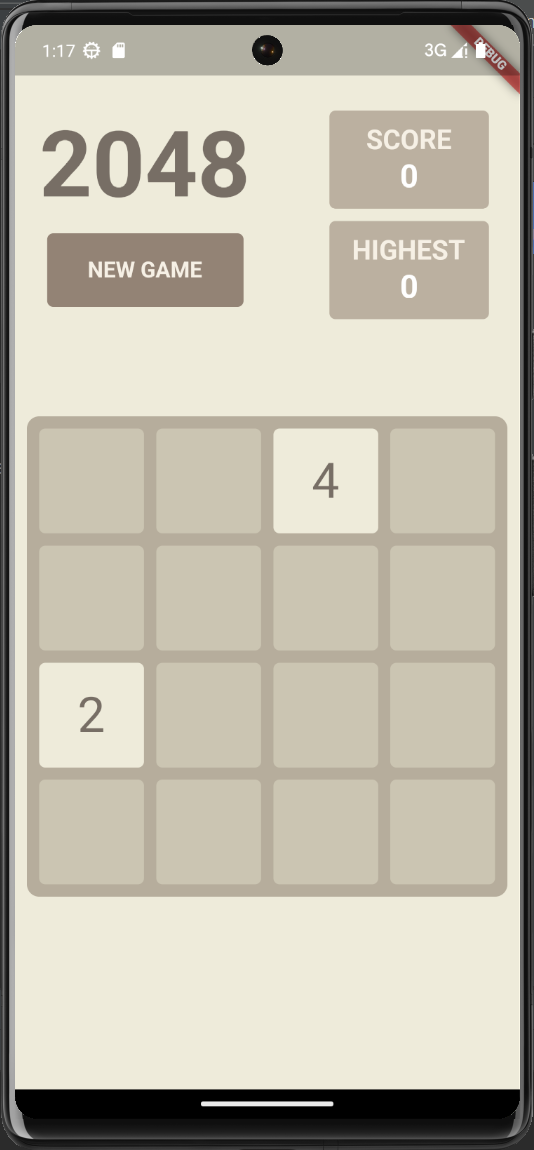
  • UI界面
    • Header部分
    • Panel部分
  • 游戏逻辑
    • 数据源与游戏初始化
    • 滑动手势识别
    • 数字块的移动与合并
    • 产生新的数字块
    • 判断游戏结束
    • 重新开始游戏

UI界面

Header部分

简单分析:

  • 主要是Row结构,children左右均为Column结构
  • 代码:
1
2
3
4
5
6
7
8
9
10
11
12
13
14
15
16
17
18
19
20
21
22
23
24
25
26
27
28
29
30
31
32
33
34
35
@override
Widget build(BuildContext context) {
return Row(
mainAxisAlignment: MainAxisAlignment.spaceBetween,
crossAxisAlignment: CrossAxisAlignment.start,
children: [
Container(
padding: const EdgeInsets.fromLTRB(20, 40, 0, 0),
child: Column(
children: [
const Text("2048",
style: TextStyle(
fontSize: 75,
color: numColor,
fontWeight: FontWeight.bold
),),
SizedBox(height: 12,),
newGame()
],
),
),
Container(
padding: const EdgeInsets.fromLTRB(0, 40, 25, 0),
child: Column(
crossAxisAlignment: CrossAxisAlignment.end,
children: [
NumCard(text:'SCORE', score:currentScore),
const SizedBox(height: 10,),
NumCard(text:'HIGHEST', score:highestScore),
]
),
),
]
);
}
1
2
3
4
5
6
7
8
9
10
11
12
13
14
15
16
17
18
19
20
21
22
23
24
25
26
27
28
29
30
31
32
33
34
35
36
37
38
39
40
41
42
43
44
45
Container newGame() {
return Container(
height: 60,
width: 160,
decoration: BoxDecoration(
borderRadius: BorderRadius.circular(5),
color: newGameColor
),
child: InkWell(
onTap: () {
// 重新开始游戏,这里的逻辑之后再实现
},
child: const Column(
mainAxisAlignment: MainAxisAlignment.center,
children: [
Text('NEW GAME', style: TextStyle(
color: whiteText, fontSize: 18, fontWeight: FontWeight.bold)),
SizedBox(height: 1,)
],
),
),
);
}

Container NumCard({String? text, int? score}) {
return Container(
height: 80,
width: 130,
decoration: BoxDecoration(
borderRadius: BorderRadius.circular(5),
color: numCardColor
),
child: Column(
mainAxisAlignment: MainAxisAlignment.center,
children: [
Text(text!, style: const TextStyle(
color: whiteText, fontSize: 22, fontWeight: FontWeight.bold)),
const SizedBox(height: 1,),
Text(score!.toString(), style: const TextStyle(color: Colors.white,
fontSize: 26,
fontWeight: FontWeight.bold),)
],
)
);
}

Panel部分

分析:

  • 首先实现底部的深色背景,接着数组映射到每一个小方块,其中映射通过GridView组件快速的构建出4x4的网格,而GridView常与AspectRatio组件一起搭配(GridView作为AR的child)

在GridView 中,要控制住每一张图片或方块的宽高比。

如果没有AspectRatio 控件则比较难实现,因为要算间距之类的。

但是有了 AspectRatio,我们的代码就会简单很多

知识点

AspectRatio参考文章

GridView参考文章Flutter网格型布局 - GridView篇 - 掘金 (juejin.cn)

AspectRatio 控件

AspectRatio构造函数

1
2
3
4
5
6
7
8
const AspectRatio({
Key? key,
required this.aspectRatio,
Widget? child,
}) : assert(aspectRatio != null),
assert(aspectRatio > 0.0),
// can't test isFinite because that's not a constant expression
super(key: key, child: child);

AspectRatio属性和说明

字段 属性 描述
aspectRatio double 纵横比例
child Widget 子组件

aspectRatio、child

aspectRatio 主要用来设定子组件的纵横比例,而child就是需要被设定纵横比例的子组件。

GridView组件

GridView一共有5个构造函数:GridViewGridView.builderGridView.countGridView.extentGridView.custom

我在游戏里用的是GridView.builder

来看下GridView构造函数(已省略不常用属性):

1
2
3
4
5
6
7
8
9
10
11
12
GridView({
Key key,
Axis scrollDirection = Axis.vertical,
bool reverse = false,
ScrollController controller,
ScrollPhysics physics,
bool shrinkWrap = false,
EdgeInsetsGeometry padding,
@required this.gridDelegate,
double cacheExtent,
List<Widget> children = const <Widget>[],
})

重点关注下gridDelegate这个参数,它其实是GridView组件如何控制排列子元素的一个委托。跟踪源码我们可以在scroll_view.dart中看到,gridDelegate的类型是SliverGridDelegate,进一步跟踪进sliver_grid.dart可以看到SliverGridDelegate其实是一个抽象类,而且一共有两个实现类:

  • SliverGridDelegateWithFixedCrossAxisCount:用于固定列数的场景;
  • SliverGridDelegateWithMaxCrossAxisExtent:用于子元素有最大宽度限制的场景;

来看下其构造函数:

1
2
3
4
5
6
复制代码SliverGridDelegateWithFixedCrossAxisCount({
@required this.crossAxisCount,
this.mainAxisSpacing = 0.0,
this.crossAxisSpacing = 0.0,
this.childAspectRatio = 1.0,
})
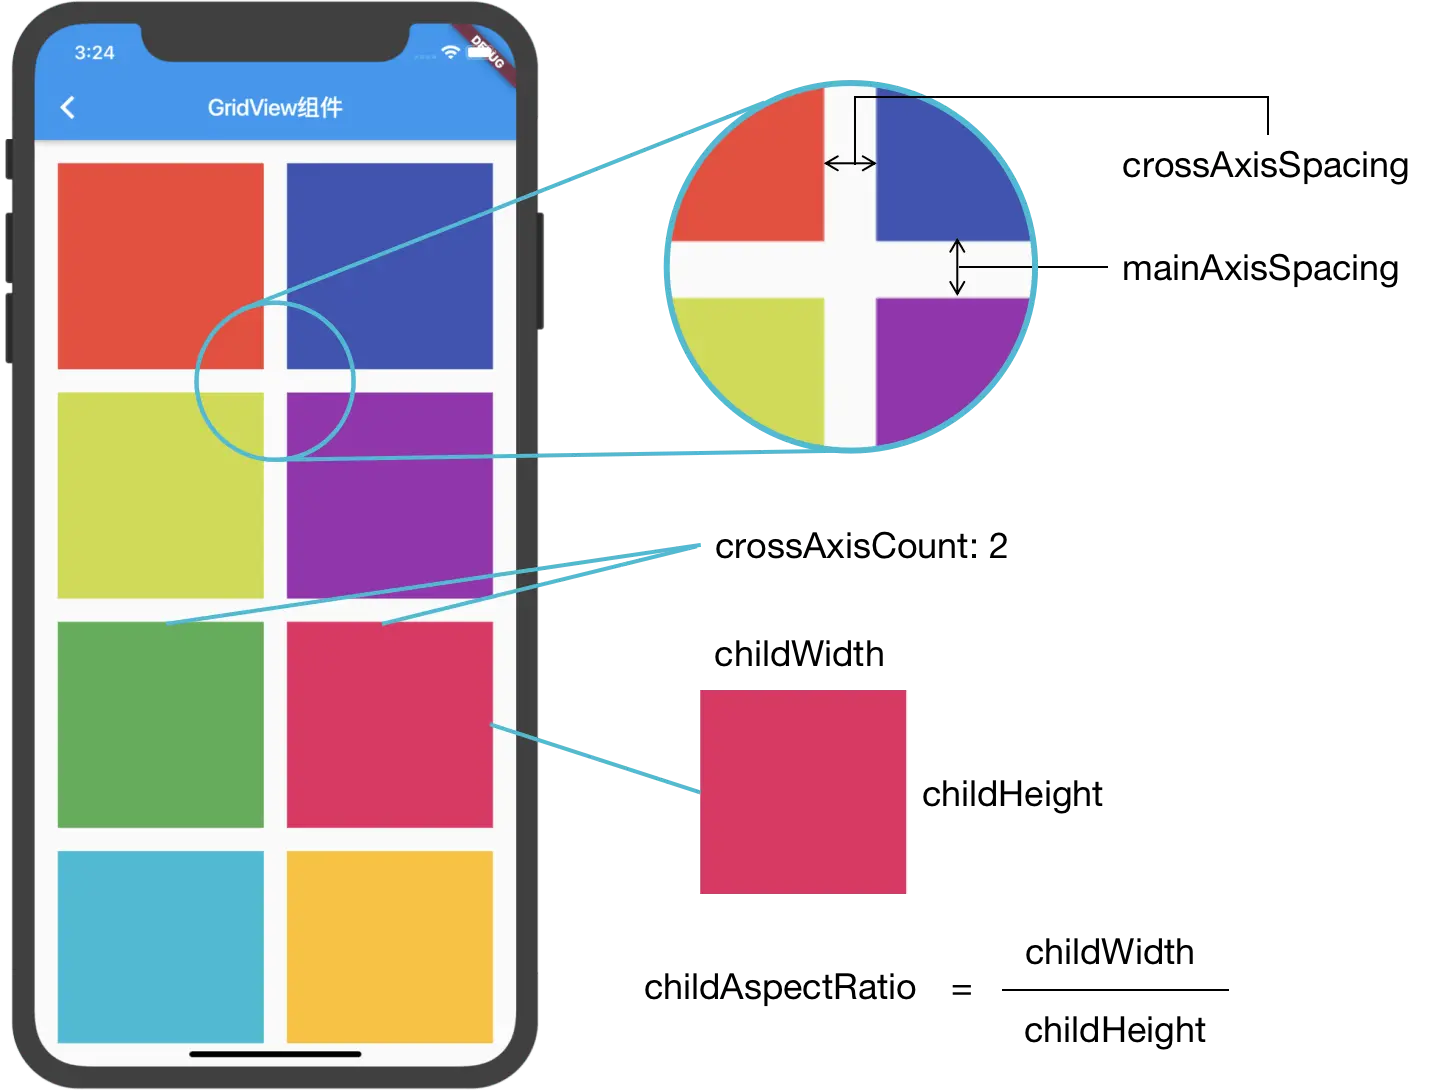
  • crossAxisCount:列数,即一行有几个子元素;
  • mainAxisSpacing:主轴方向上的空隙间距;
  • crossAxisSpacing:次轴方向上的空隙间距;
  • childAspectRatio:子元素的宽高比例。

参数含义解释

想必看到上面的示例图,你就秒懂其中各个参数的含义了。不过,这里有一点需要特别注意:如果你的子元素宽高比例不为1,那么你一定要设置childAspectRatio属性

还记得之前GridView的各种构造函数吗?其实:

  1. GridView默认构造函数可以类比于ListView默认构造函数,适用于有限个数子元素的场景,因为GridView组件会一次性全部渲染children中的子元素组件;
  2. GridView.builder构造函数可以类比于ListView.builder构造函数,适用于长列表的场景,因为GridView组件会根据子元素是否出现在屏幕内而动态创建销毁,减少内存消耗,更高效渲染;
  3. GridView.count构造函数是GrdiView使用SliverGridDelegateWithFixedCrossAxisCount的简写(语法糖),效果完全一致;
  4. GridView.extent构造函数式GridView使用SliverGridDelegateWithMaxCrossAxisExtent的简写(语法糖),效果完全一致。

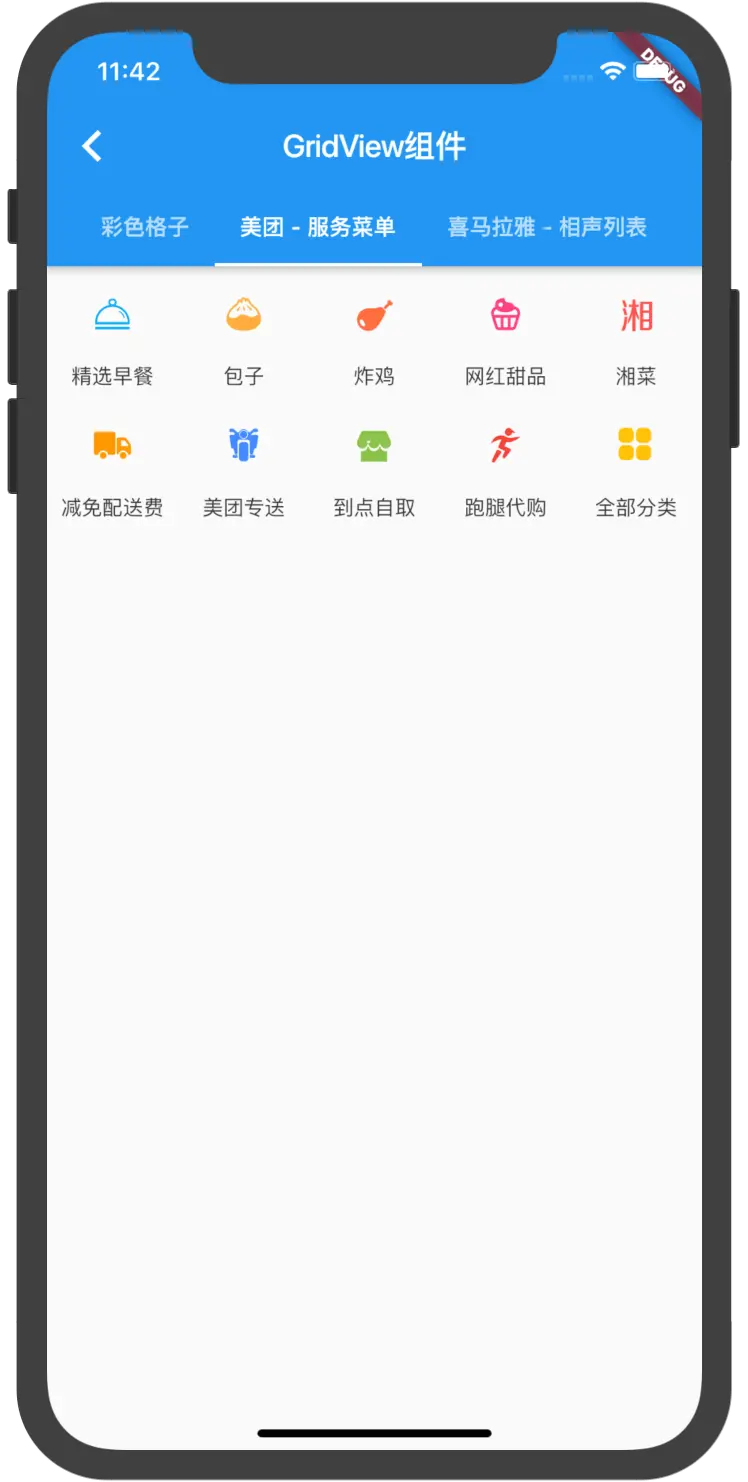
先来看一个简单的例子,它使用到GridView.count构造函数模仿美团外卖首页服务列表(服务菜单项的代码可以看这里,也算是对基础组件使用的进一步巩固):

代码(文件地址

1
2
3
4
5
6
7
8
9
10
11
12
13
14
15
16
17
GridView.count(
crossAxisCount: 5,
padding: EdgeInsets.symmetric(vertical: 0),
children: serviceList.map((item) => ServiceItem(data: item)).toList(),
)

/*************/
/* 完全等同于 */
/************/

GridView(
padding: EdgeInsets.symmetric(vertical: 0),
gridDelegate: SliverGridDelegateWithFixedCrossAxisCount(
crossAxisCount: 5,
),
children: serviceList.map((item) => ServiceItem(data: item)).toList(),
)

预览

img

再来看一个模仿喜马拉雅中相声列表用到GridView.builder创建网格布局的具体例子(相声卡片的代码可以看这里):

代码(文件地址

1
2
3
4
5
6
7
8
9
10
11
12
13
14
15
16
17
18
19
20
21
22
23
24
25
26
GridView.builder(
// 让 GridView 的大小自动适应子项的大小
shrinkWrap: true,
// 设置子项的数量为 programmeList 的长度
itemCount: programmeList.length,
// 禁用滚动功能
physics: NeverScrollableScrollPhysics(),
// 设置子项的内边距
padding: EdgeInsets.symmetric(horizontal: 16),
// 设置网格布局的参数
gridDelegate: SliverGridDelegateWithFixedCrossAxisCount(
// 每行显示的列数
crossAxisCount: 3,
// 主轴方向(垂直方向)上的间距
mainAxisSpacing: 10,
// 交叉轴方向(水平方向)上的间距
crossAxisSpacing: 10,
// 子项的纵横比
childAspectRatio: 0.7,
),
// 构建子项的方法
itemBuilder: (context, index) {
// 返回一个 Programme 组件,传入相应的数据
return Programme(data: programmeList[index]);
},
)

预览

img

我的实现:

1
2
3
4
5
6
7
8
9
10
11
12
13
14
15
16
17
18
19
20
21
22
23
24
25
26
27
28
29
30
31
32
33
34
35
36
AspectRatio(
aspectRatio: 1.0,
child: Container(
child: _buildGameFrame(
context,
Container(
padding: EdgeInsets.all(10),
decoration: BoxDecoration(
color: bgColor2,
borderRadius: BorderRadius.circular(10),
),
child: MediaQuery.removePadding(
removeTop: true,
/// GridView 默认顶部会有 padding,通过这个删除顶部 padding
context: context,
child: GridView.builder(
physics: const NeverScrollableScrollPhysics(),
/// 禁用 GridView 的滑动
gridDelegate: const SliverGridDelegateWithFixedCrossAxisCount(
crossAxisCount: SIZE,
childAspectRatio: 1,
mainAxisSpacing: 10,
crossAxisSpacing: 10,
),
itemCount: SIZE * SIZE,
itemBuilder: (context, int index) {
int indexI = index ~/ SIZE;
int indexJ = index % SIZE;
return _buildGameCell(_gameMap.tile(indexI, indexJ));
},
),
),
),
),
),
),

游戏逻辑

颜色配置

1
2
3
4
5
6
7
8
9
10
11
12
13
14
15
16
17
18
19
20
21
22
23
24
25
26
27
28
29
30
31
32
33
34
35
36
37
38
39
40
41
42
43
44
45
46
47
48
49
50
51
52
53
54
55
56
57
58
59
60

import 'dart:ui';

import 'package:flutter/material.dart';

const double cornerRadius = 8.0;
const double moveInterval = .5;


/// 背景颜色
const Color bgColor1 = Color(0xFFFAF8EF);
const Color bgColor2 = Color.fromRGBO(182,173,156,1);
const Color bgColor3 = Color(0xFF8F7B65);


const Color whiteText = Color.fromARGB(255, 246, 240, 229);
const Color lightBrown = Color.fromARGB(255, 236, 224, 208);
const Color numCardColor = Color.fromRGBO(187,176,160,1);
const Color newGameColor = Color.fromARGB(255, 147, 131, 117);
const Color orange = Color.fromARGB(255, 245, 149, 99);
const Color tileColor = Color.fromRGBO(203,197,178,1);

const Color tan = Color.fromARGB(255, 238, 235, 218);
const Color numColor = Color.fromARGB(255, 119, 110, 101);
const Color greyText = Color.fromARGB(255, 119, 110, 101);


const Map<int, Color> numTileColor = {
0: Color.fromRGBO(203,197,178,1),
2: tan,
4: tan,
8: Color.fromARGB(255, 242, 177, 121),
16: Color.fromARGB(255, 245, 149, 99),
32: Color.fromARGB(255, 246, 124, 95),
64: const Color.fromARGB(255, 246, 95, 64),
128: const Color.fromARGB(255, 235, 208, 117),
256: const Color.fromARGB(255, 237, 203, 103),
512: const Color.fromARGB(255, 236, 201, 85),
1024: const Color.fromARGB(255, 229, 194, 90),
2048: const Color.fromARGB(255, 232, 192, 70),
};

const Map<int, Color> numTextColor = {
0: Color.fromRGBO(0, 0, 0, 0),
2: greyText,
4: greyText,
8: Colors.white,
16: Colors.white,
32: Colors.white,
64: Colors.white,
128: Colors.white,
256: Colors.white,
512: Colors.white,
1024: Colors.white,
2048: Colors.white,
};

用字典将数字与数字背景色和数字字体色对应起来,方便映射渲染。

基本框架

1
2
3
4
5
6
7
8
9
10
11
12
13
@override
Widget build(BuildContext context) {
if (_isGameOver) {
return Stack(
children: [
_buildGamePanel(context),
_buildGameOverMask(context),
],
);
} else {
return _buildGamePanel(context);
}
}

数据源与游戏初始化

本游戏二维列表为数据源,通过_buildGameCell方法映射渲染

1
2
3
4
5
6
7
8
9
10
11
12
13
14
15
16
Widget _buildGameCell(int value) {
return Container(
decoration: BoxDecoration(
color: numTileColor[value],
borderRadius: BorderRadius.circular(5)
),
child: Center(
child: Text(
value == 0 ? '' : value.toString(),
style: TextStyle(
color: numTextColor[value],
fontSize: 40
),
),
),
);

初始化

1
2
3
4
5
6
7
8
9
10
11
12
13
14
  @override
void initState() {
logic.reset(_gameMap);
//数组清0,gameover设为false;
super.initState();
_initGameMap();
}

/// 初始化数据
void _initGameMap() {
/// 执行两次随机
_randomNewCellData(2);
_randomNewCellData(4);
}

滑动手势识别

GestureDetector参考文章 Flutter 手势系列教程—GestureDetector - 掘金 (juejin.cn)

其分为

  • 单击手势
  • 双击手势
  • 长按手势
  • 垂直滑动手势
  • 水平滑动手势
  • 拖动手势
  • 缩放手势
  • 其他手势

本来我是使用垂直滑动和水平滑动手势的,但是一次手势只能对应一次滑动,索性直接用拖动手势判断了

拖动手势总共有五种,分别如下:

字段 属性 描述
onPanDown GestureDragDownCallback 手指按下时的回调函数
onPanStart GestureDragStartCallback 手指开始拖动时的回调函数
onPanUpdate GestureDragUpdateCallback 手指移动时的回调函数
onPanEnd GestureDragEndCallback 手指抬起时的回调函数
onPanCancel GestureDragCancelCallback 手指取消拖动时的回调函数

代码:

1
2
3
4
5
6
7
8
9
10
11
12
13
14
15
16
17
18
19
20
21
22
23
24
25
26
27
28
29
30
31
32
33
34
35
36
37
38
39
40
41
Offset lastPosition = Offset.zero;
return GestureDetector(
onPanDown: (DragDownDetails details) {
lastPosition = details.globalPosition;
_firstTouch = true;
},
onPanUpdate: (details) {
final curPosition = details.globalPosition;
if ((curPosition.dx - lastPosition.dx).abs() > _mainAxisMinLimit &&
(curPosition.dy - lastPosition.dy).abs() < _crossAxisMaxLimit) {
// 水平
if (_firstTouch) {
_firstTouch = false;
if ((curPosition.dx - lastPosition.dx).abs() > _crossAxisMaxLimit) {
if(curPosition.dx - lastPosition.dx > 0) {
setMoveState(Side.EAST);
} else {
setMoveState(Side.WEST);
}
}
}
} else if((curPosition.dy - lastPosition.dy).abs() >
_mainAxisMinLimit &&
(curPosition.dx - lastPosition.dx).abs() < _crossAxisMaxLimit){
//垂直
if ((curPosition.dy - lastPosition.dy).abs() > _mainAxisMinLimit) {
if (_firstTouch) {
_firstTouch = false;
if(curPosition.dy - lastPosition.dy > 0) {
setMoveState(Side.SOUTH);
} else {
setMoveState(Side.NORTH);
}
}
}
}

},
child: AspectRatio( 省略 ),
),
);
1
2
3
4
5
6
7
8
9
10
11
12
13
14
15
16
17
18
19
20
21
22
23
24
25
26
27
void setMoveState(Side side) {
return setState(() {
switch (side) {
case Side.NORTH:
_joinGameMapDataToTop();
break;
case Side.SOUTH:
_joinGameMapDataToBottom();
break;
case Side.EAST:
_joinGameMapDataToRight();
break;
case Side.WEST:
_joinGameMapDataToLeft();
break;
default:
throw Exception('Invalid side: $this');
}
if (!_noMoveInSwipe) {
//_noMoveInSwipe是检查移动时是不是属于有效移动,若是,则随机添加。
var a = Random().nextDouble();
if (a < 0.75) _randomNewCellData(2);
else _randomNewCellData(4);
}
checkEnd();
});
}

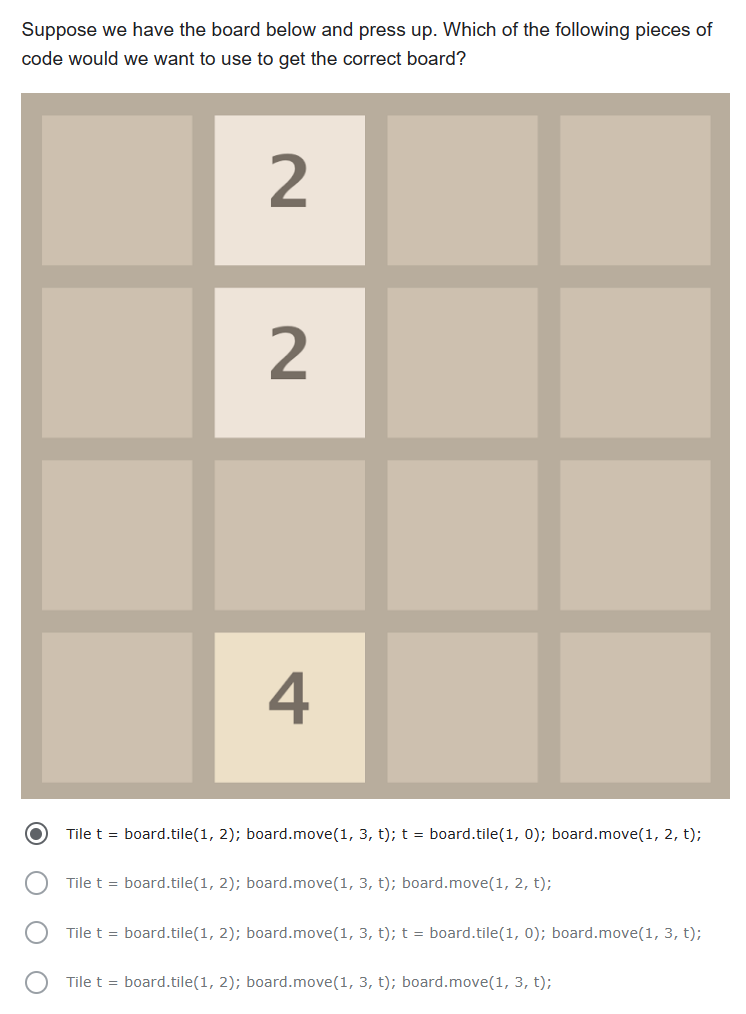
数字块的移动与合并

失败的构想

我们可以设置一个Side类,它枚举四个方位,初始方向是北

我们只需要实现向上滑的逻辑,然后通过改变视角,即数组的旋转,使其套用之前实现好的向上滑的逻辑,就可以实现一套代码多次使用。但是改变视角的逻辑我没写出来。。。。

移动合并的逻辑
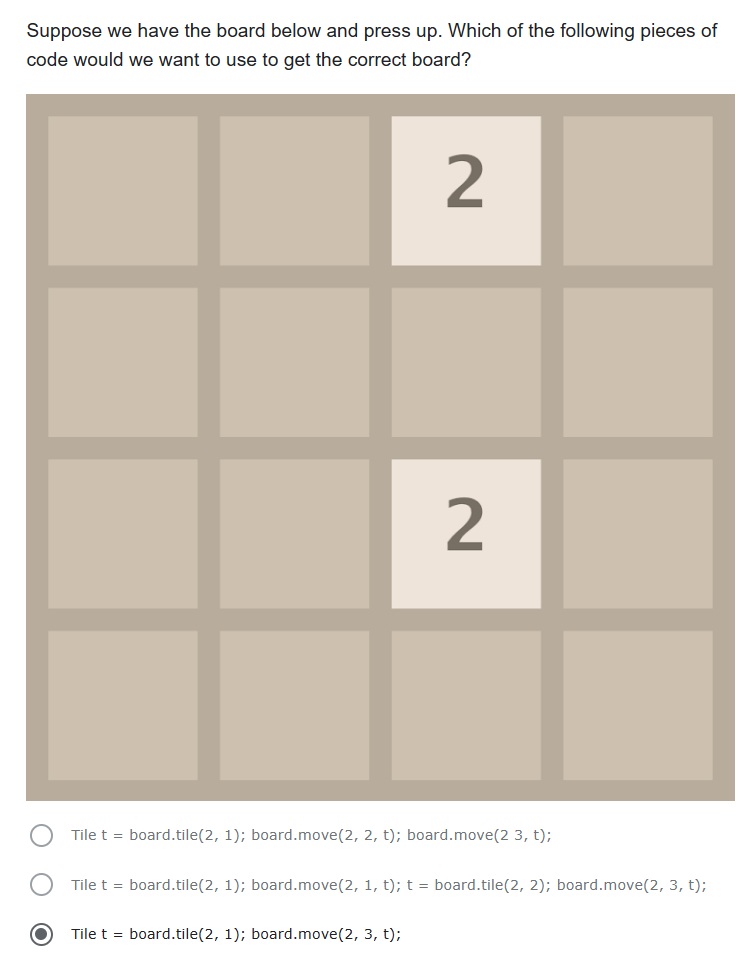
image-20240118213830819

image-20240118213851546

1
2
3
4
5
6
7
8
9
10
11
12
13
14
15
16
17
18
19
20
21
22
23
24
 bool tilt(Side side) {
print("tilt work");
bool changed;
changed = false;

// TODO: Modify this._gameMap (and perhaps this.score) to account
// for the tilt to the Side SIDE. If the _gameMap changed, set the
// changed local variable to true.
_gameMap.setViewingPerspective(side);

移动合并的逻辑;

_gameMap.setViewingPerspective(Side.NORTH);
checkEnd();
if (changed) {
setState(() {
_noMoveInSwipe = true;
});
} else {
setState(() => _noMoveInSwipe = false);
}
return changed;
}
}
1
2
3
4
5
6
7
8
9
10
11
12
13
14
15
16
17
18
19
20
21
22
23
24
25
26
27
28
29
30
31
32
33
34
35
36
37
38
39
40
41
42
43
void moveTilesUp() {
bool changed = false;
//假设tile(c, r)是以左下角为原点的坐标轴计算的。
// 遍历每一列
for (int c = 0; c < _gameMap.size(); c++) {
// 从上往下开始遍历
for (int r = _gameMap.size() - 1; r >= 0; r--) {
int t = _gameMap.tile(c, r); // 获取当前位置上的数字方块的值
int row = r; // 初始化行数

if (_gameMap.tile(c, r) != 0) { // 如果当前位置有数字方块
// 向上搜索空格,以便移动数字方块
for (int i = _gameMap.size() - 1; i > r; i--) {
if (_gameMap.tile(c, i) == 0) {
// 将数字方块移动到空格所在的行,并更新行数
setState(() => _gameMap.move(c, i, c, r));
row = i;
changed = true;
break;
}
}

// 向下搜索相同数字方块,以便合并
for (int i = row - 1; i >= 0; i--) {
if (_gameMap.tile(c, i) != 0 && t != _gameMap.tile(c, i)) {
// 如果找到了不同的数字方块,停止搜索
break;
} else if (_gameMap.tile(c, i) != 0 && t == _gameMap.tile(c, i)) {
// 如果找到了相同的数字方块,进行合并操作
setState(() => _gameMap.move(c, row, c, i));
changed = true;
logic.currentScore += _gameMap.tile(c, row); // 更新分数
break;
}
}
}
}
}
// 标记状态已经改变
if (changed) {
// 更新游戏状态
}
}

分数的更新

privide参考文章

因为我Header和Panel是分开的,导致分数的传递很麻烦,于是我用了Flutter的Provider状态管理

首先我在main函数添加了ChangeNotifierProvider组件

1
2
3
4
5
6
7
8
void main() {
runApp(ChangeNotifierProvider(
create: (_) => Score(),
child: MaterialApp(
home: MyGame(),
)
));
}

模组Score为:

1
2
3
4
5
6
7
8
9
10
11
12
13
14
15
16
17
18
19
20
21
22
23
class Score with ChangeNotifier {
/// 当前分数
int currentScore = 0;
/// 历史最高分
int highestScore = 0;

getCur() => currentScore;
getHigh() => highestScore;

clearScore() {
currentScore = 0;
}

void setScore(int s) {
currentScore += s;
if (currentScore > highestScore) {
highestScore = currentScore;
}
notifyListeners();
}

....省略
}

这样子在Panel中合并时,调用setScore,这样子notifyListeners()就会通知Hearder中的分数更新

1
2
3
4
5
6
7
8
9
10
11
12
13
14
15
Container(
padding: const EdgeInsets.fromLTRB(0, 40, 25, 0),
child: Column(
crossAxisAlignment: CrossAxisAlignment.end,
children: [
Consumer<Score>(builder:(context, currentScore, child) {
return NumCard(text:'SCORE', score:Provider.of<Score>(context, listen: false).currentScore);
}),
const SizedBox(height: 10,),
Consumer<Score>(builder:(context, highestScore, child) {
return NumCard(text:'HIGHEST', score:Provider.of<Score>(context, listen: false).highestScore);
})
]
),
),

最高分数的导入

shared_preferences参考文章 Flutter shared_preferences的基本使用、源码分析、封装 - 掘金 (juejin.cn)

导入插件shared_preferences: ^2.0.7

获取实例对象

1
SharedPreferences? sharedPreferences = await SharedPreferences.getInstance();

设置持久化数据

我们可以通过sharedPreferences的实例化对象调用对应的set方法设置持久化数据

1
2
3
4
5
6
7
8
9
10
11
12
13
14
15
16
17
18
19
20
21
22
23
24
SharedPreferences? sharedPreferences;

// 设置持久化数据
void _setData() async {
// 实例化
sharedPreferences = await SharedPreferences.getInstance();

// 设置string类型
await sharedPreferences?.setString("name", "Jimi");

// 设置int类型
await sharedPreferences?.setInt("age", 18);

// 设置bool类型
await sharedPreferences?.setBool("isTeacher", true);

// 设置double类型
await sharedPreferences?.setDouble("height", 1.88);

// 设置string类型的数组
await sharedPreferences?.setStringList("action", ["吃饭", "睡觉", "打豆豆"]);

setState(() {});
}

读取持久化数据

我们可以通过sharedPreferences的实例化对象调用对应的get方法读取持久化数据

1
2
3
4
5
6
7
8
9
10
11
12
13
14
15
16
17
18
19
20
21
22
23
24
25
26
27
28
29
30
31
32
33
34
Text("名字: ${sharedPreferences?.getString("name") ?? ""}",
style: TextStyle(
color: Colors.blue,
fontSize: 20
),
),
SizedBox(height: 20,),
Text("年龄: ${sharedPreferences?.getInt("age") ?? ""}",
style: TextStyle(
color: Colors.red,
fontSize: 20
),
),
SizedBox(height: 20,),
Text("是老师吗?: ${sharedPreferences?.getBool("isTeacher") ?? ""}",
style: TextStyle(
color: Colors.orange,
fontSize: 20
),
),
SizedBox(height: 20,),
Text("身高: ${sharedPreferences?.getDouble("height") ?? ""}",
style: TextStyle(
color: Colors.pink,
fontSize: 20
),
),
SizedBox(height: 20,),
Text("我正在: ${sharedPreferences?.getStringList("action") ?? ""}",
style: TextStyle(
color: Colors.purple,
fontSize: 20
),
),

代码

1
2
3
4
5
6
7
8
9
10
11
12
13
14
15
16
17
18
19
20
21
22
23
24
25
static const GAME_2048_HIGHEST_SCORE = "game_2048_highest_score";

Future<SharedPreferences> _spFuture = SharedPreferences.getInstance();

_GameHeader() {
initState();
}

@override
void initState() {
super.initState();
readHighestScoreFromSp();
}

void readHighestScoreFromSp() async {
final SharedPreferences sp = await _spFuture;
setState(() {
//Score.setScore(sp.getInt(GAME_2048_HIGHEST_SCORE) ?? 0);
});
}

void storeHighestScoreToSp() async {
final SharedPreferences sp = await _spFuture;
//await sp.setInt(GAME_2048_HIGHEST_SCORE, Score.getHigh());
}

判断游戏结束

1
2
3
4
5
6
7
8
9
10
11
12
13
14
15
16
17
18
19
20
21
22
23
24
25
26
27
28
29
30
31
32
33
@override
bool checkEnd(GameMap b) {
return maxTileExists(b) || !atLeastOneMoveExists(b);
}

static bool maxTileExists(GameMap b) {
for (int r = 0; r < b.size(); r++) {
for (int c = 0; c < b.size(); c++) {
if (b.tile(c, r) == MAX_PIECE) {
return true;
}
}
}
return false;
}

static bool atLeastOneMoveExists(GameMap b) {
if (b.hasEmptySpace()) return true;
for (int r = 0; r < b.size(); r++) {
for (int c = 0; c < b.size(); c++) {
if ((c - 1 >= 0 && c + 1 < b.size()) &&
(b.tile(c - 1, r) == b.tile(c, r) ||
b.tile(c + 1, r) == b.tile(c, r))) {
return true;
} else if ((r - 1 >= 0 && r + 1 < b.size()) &&
(b.tile(c, r - 1) == b.tile(c, r) ||
b.tile(c, r + 1) == b.tile(c, r))) {
return true;
}
}
}
return false;
}

重新开始游戏

privide参考文章

因为我Header和Panel是分开的,所以又有一个头疼的问题:NEW GAME按钮按下后,列表被清零了,但是 Panel页面并不会得到更新的通知,所以为了解决这个问题,我又使用了Provider

Header

1
2
3
4
5
6
onTap: () {
setState(() {
Provider.of<Score>(context, listen: false).currentScore = 0;
Provider.of<Score>(context, listen: false).NewGame();
});
},

Panel

1
2
3
4
5
6
7
void NewGame() {
setState(() {
Provider.of<Score>(context, listen: false).currentScore = 0;
Provider.of<Score>(context, listen: false).NewGame();
_isGameOver = false;
});
}
1
2
3
4
5
6
7
8
AspectRatio(
...省略
itemBuilder: (context, int index) {
int indexI = index ~/ SIZE;
int indexJ = index % SIZE;
return _buildGameCell(Provider.of<Score>(context, listen: true).tile1(indexI, indexJ));
},
),

不知道为什么只有listen设为true后才有用