Puzzle | 字数总计: 2.5k | 阅读时长: 11分钟 | 阅读量:
github仓库:xxbaizero0/PuzzleFlutterGame: A flutter game (github.com)
AspectRatio参考文章
- Flutter 约束宽高比的控件 AspectRatio - 掘金 (juejin.cn)
- flutter系列之:按比例缩放的AspectRatio和FractionallySizedBox - 掘金 (juejin.cn)
GridView参考文章Flutter网格型布局 - GridView篇 - 掘金 (juejin.cn)
对话框参考文章: Flutter之Dialog使用和踩坑 - 掘金 (juejin.cn)
privide参考文章
- Flutter Provider状态管理—八种提供者使用分析 - 掘金 (juejin.cn)
- https://flyingstudio.feishu.cn/wiki/E2TSwTtZ9ik92EkCLpHcjAvbnRu?from=from_copylink
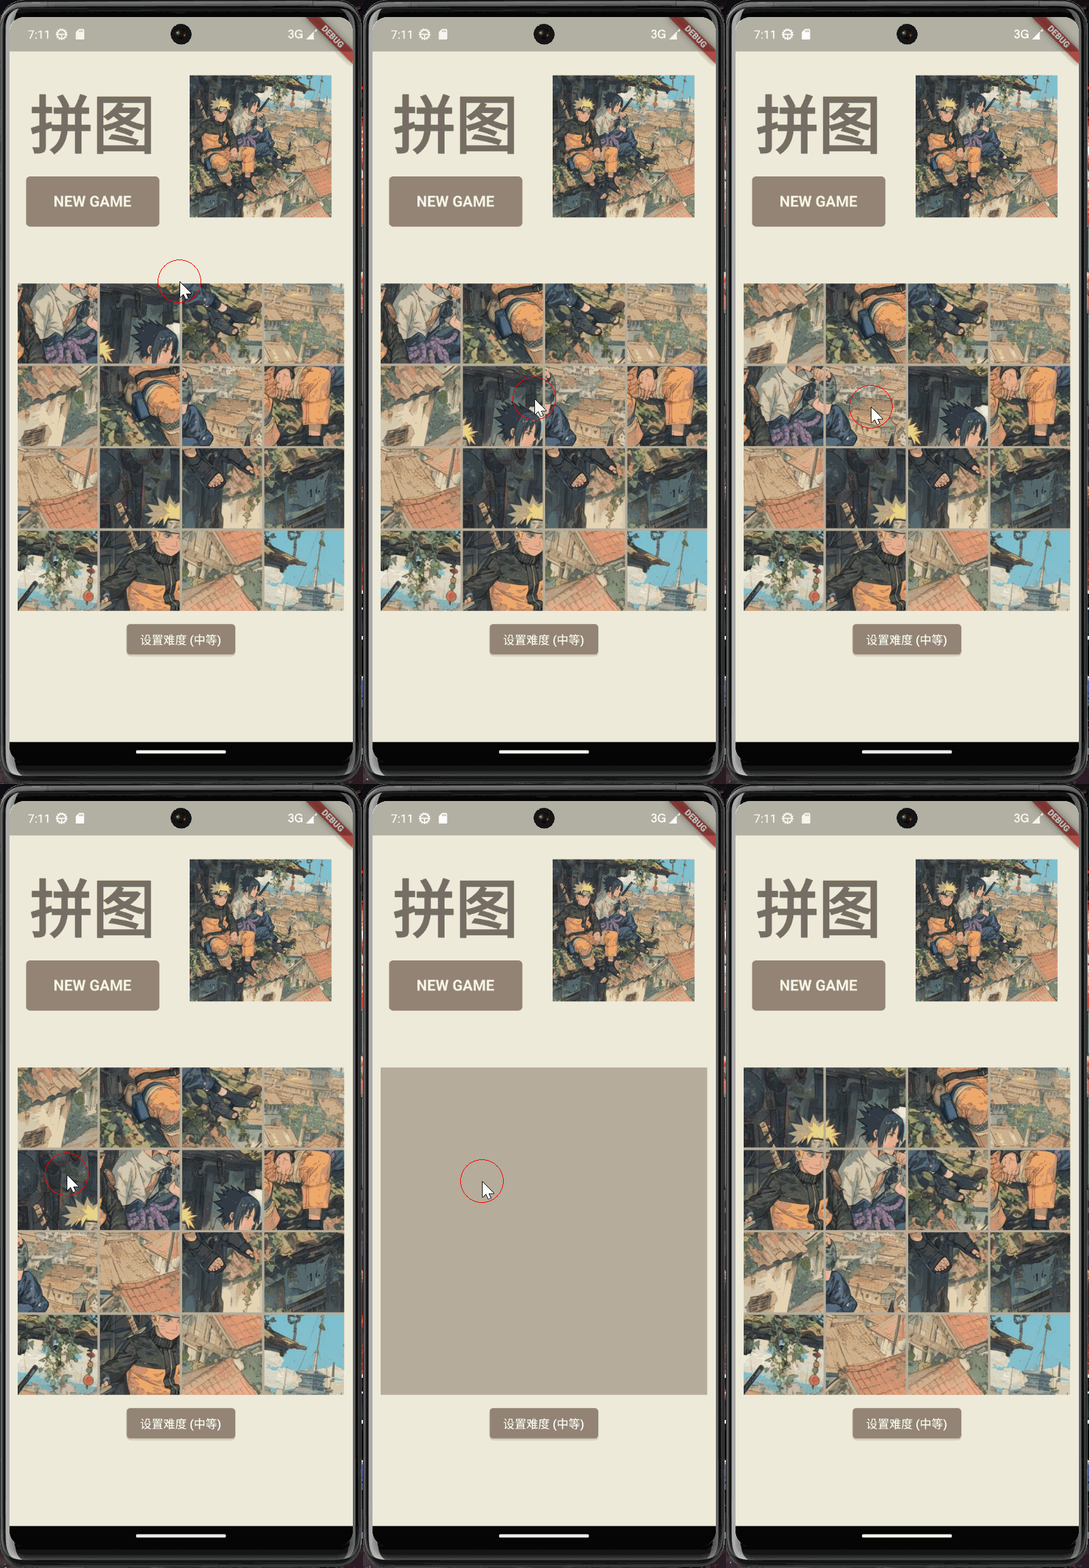
预览
UI界面
游戏逻辑
数据源与游戏初始化
图片切割
滑动手势识别
图片的移动与合并
判断游戏结束
重新开始游戏
设置难度
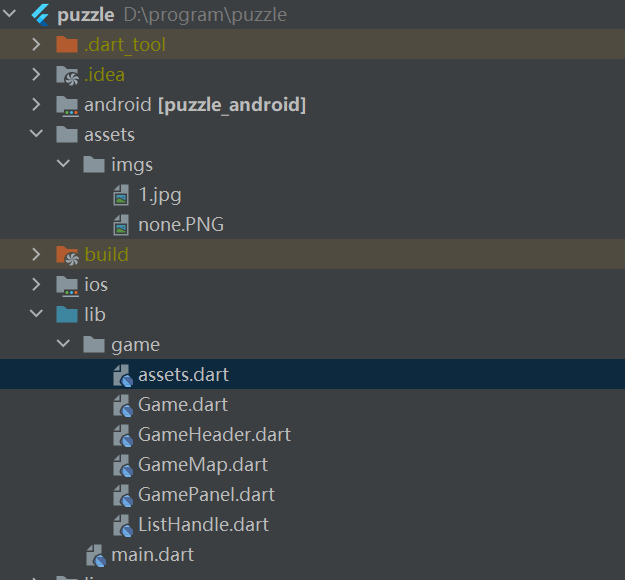
初始设置 文件结构
pubspec.yaml文件
1
2
3
4
5
6
7
8
9
10
dependencies: flutter: sdk: flutter image: ^4.1 .7 provider: ^6.1 .2 flutter: assets: - assets/imgs/
UI界面 Header界面比较容易,分析一下就是一个Row接两个Column就好了,代码如下
1
2
3
4
5
6
7
8
9
10
11
12
13
14
15
16
17
18
19
20
21
22
23
24
25
26
27
28
29
30
31
32
33
34
35
36
37
38
39
40
41
42
43
44
45
46
47
48
49
50
51
52
53
54
55
56
57
@override Widget build(BuildContext context) { return Row( mainAxisAlignment: MainAxisAlignment.spaceBetween, crossAxisAlignment: CrossAxisAlignment.start, children: [ Container( padding: const EdgeInsets.fromLTRB(20 , 40 , 0 , 0 ), child: Column( children: [ const Text("拼图" , style: TextStyle( fontSize: 75 , color: Color.fromARGB(255 , 119 , 110 , 101 ), fontWeight: FontWeight.bold ),), SizedBox(height: 12 ,), newGame() ], ), ), Container( padding: const EdgeInsets.fromLTRB(0 , 40 , 25 , 0 ), child: Image.asset( Assets.img1, fit: BoxFit.fill, width: 170 , height: 170 , ) ), ] ); } Container newGame() { return Container( height: 60 , width: 160 , decoration: BoxDecoration( borderRadius: BorderRadius.circular(5 ), color: Color.fromARGB(255 , 147 , 131 , 117 ) ), child: InkWell( onTap: () { Provider.of<GameMap>(context, listen: false ).init(); }, child: const Column( mainAxisAlignment: MainAxisAlignment.center, children: [ Text('NEW GAME' , style: TextStyle( color: Color.fromARGB(255 , 246 , 240 , 229 ), fontSize: 18 , fontWeight: FontWeight.bold)), SizedBox(height: 1 ,) ], ), ), ); }
Panel 分析一下,这个Panel有一个正方形的组件,正方形组件下面有个按钮
正方形组件 AspectRatio参考文章
- Flutter 约束宽高比的控件 AspectRatio - 掘金 (juejin.cn)
- flutter系列之:按比例缩放的AspectRatio和FractionallySizedBox - 掘金 (juejin.cn)
首先大框架是AspectRatio,设置正方形宽高比是1:1
然后使用GridView这个组件,将我们的拼图块一一网状排布。
1
2
3
4
5
6
7
8
9
10
11
12
13
14
15
16
17
18
19
20
21
22
23
24
25
26
27
28
29
30
31
32
AspectRatio Frame(BuildContext context, Widget child) { double minSize = min( MediaQuery.of(context).size.width, MediaQuery.of(context).size.height); return AspectRatio( aspectRatio: 1.0 , child: Container( key: _redKey, color: Color.fromRGBO(182 ,173 ,156 ,1 ), width: minSize, height: minSize, margin: EdgeInsets.all(10 ), child: Container( child: MediaQuery.removePadding( removeTop: true , context: context, child: GridView.builder( physics: const NeverScrollableScrollPhysics(), gridDelegate: SliverGridDelegateWithFixedCrossAxisCount( crossAxisCount: Provider.of<GameMap>(context, listen: false ).SIZE, childAspectRatio: 1 , mainAxisSpacing: 3 , crossAxisSpacing: 3 ), itemCount: SIZE * SIZE, itemBuilder: (context, int index) { return PuzzlePart(Provider.of<GameMap>(context, listen: true ).get (index), index); }) ), ) ), ); }
按钮 按钮主要用来控制游戏难度的
参考文章:Flutter之Dialog使用和踩坑 - 掘金 (juejin.cn)
主要通过按钮唤起对话框。
对话框是路由的页面(Route) :
在 Flutter 中,页面被称为路由(Route)。对话框本质上也是一个页面,但它通常是在当前页面的上层以浮动的形式显示的。
路由是应用程序中页面的抽象,它们负责管理页面之间的导航、堆栈和状态。
由 Navigator 进行管理 :
Navigator 是用于管理路由的类,它负责路由的添加、移除和切换。
对话框是由 Navigator 来管理的,它负责在屏幕上正确地显示和隐藏对话框。
控制对话框的显示和隐藏 :
控制对话框的显示和隐藏是通过调用 Navigator 的 push 和 pop 方法来实现的。
当您想要显示对话框时,您可以使用 Navigator.of(context).push() 方法将对话框路由推入路由堆栈。这将导致对话框显示在屏幕上。
当您想要隐藏对话框时,您可以使用 Navigator.of(context).pop() 方法将对话框路由从堆栈中弹出。这将导致对话框被移除并隐藏。
在Flutter中,对话框会有两种风格,调用showDialog()方法展示的是material风格的对话框,调用showCupertinoDialog()方法展示的是ios风格的对话框。 而这两个方法其实都会去调用showGeneralDialog()方法,可以从源码中看到最后是利用Navigator.of(context, rootNavigator: true).push()一个页面。
基本要传的参数:context上下文,builder用于创建显示的widget,barrierDismissible可以控制点击对话框以外的区域是否隐藏对话框。
你会注意到,showDialog()方法返回的是一个Future对象,可以通过这个future对象来获取对话框所传递的数据。 比如我们想知道想知道用户是点击了对话框的确认按钮还是取消按钮,那就在退出对话框的时候,利用Navigator.of(context).pop(“一些数据”);
1
2
3
4
5
6
7
8
9
10
11
12
13
14
15
16
17
18
19
20
21
22
23
24
25
26
27
28
29
30
31
32
33
34
35
36
37
38
39
40
41
42
43
44
45
46
47
48
49
50
51
52
53
54
55
String _selectedDifficulty = '简单' ;ElevatedButton DifficultyButton() { return ElevatedButton( style: ElevatedButton.styleFrom( backgroundColor: Color.fromARGB(255 , 147 , 131 , 117 ) ), onPressed: () { _showDifficultyDialog(); }, child: Text('设置难度 ($_selectedDifficulty )' ), ); } Future<void > _showDifficultyDialog() async { String? selectedDifficulty = await showDialog<String >( context: context, builder: (BuildContext context) { return SimpleDialog( title: Text('设置难度' ), children: <Widget>[ SimpleDialogOption( onPressed: () { Provider.of<GameMap>(context, listen: false ).SIZE = 3 ; Provider.of<GameMap>(context, listen: false ).init(); Navigator.pop(context, '简单' ); }, child: Text('简单' ), ), SimpleDialogOption( onPressed: () { Provider.of<GameMap>(context, listen: false ).SIZE = 4 ; Provider.of<GameMap>(context, listen: false ).init(); Navigator.pop(context, '中等' ); }, child: Text('中等' ), ), SimpleDialogOption( onPressed: () { Provider.of<GameMap>(context, listen: false ).SIZE = 5 ; Provider.of<GameMap>(context, listen: false ).init(); Navigator.pop(context, '困难' ); }, child: Text('困难' ), ), ], ); }, ); if (selectedDifficulty != null ) { setState(() { _selectedDifficulty = selectedDifficulty; }); } }
Navigator.pop的context作用:
BuildContext对象是通过builder函数的参数传递的,即builder(BuildContext context)。因此,context参数指定了在哪个页面弹出对话框,并且在对话框关闭时,返回的结果将传递给该页面。
游戏逻辑 基础骨架 1 2 3 4 5 6 7 8 9 10 11 12 13 14 15 16 17 18 19 20 21 Widget build(BuildContext context) { if (isgameOver) { return Column( children: [ Stack( children: [ _gamePanel(context), _gameReset(context) ], ),DifficultyButton(), ], ); } else { return Column( children: [ _gamePanel(context), DifficultyButton(), ], ); } }
数据源与游戏初始化 数据源 数据源是一个Future<List<imglib.Image>>类型的列表,他存放着将图片切割成n块的数据
初始化 1 2 3 4 5 6 7 8 9 10 11 12 init() { final Future<List <imglib.Image>> _pieces = splitImage(Assets.img1, n : SIZE); _pieces.then((_pieces) { result = List .from(_pieces); pieces = List .from(_pieces); pieces.shuffle(Random()); notifyListeners(); }); }
图片切割 代码来源:How to split/divide image in parts in Flutter - Stack Overflow
1 2 3 4 5 6 7 8 9 10 11 12 13 14 15 16 17 18 19 20 21 22 23 24 25 26 27 28 29 30 31 import 'dart:math' ;import 'dart:typed_data' ;import 'package:image/image.dart' as imglib;Future<List <imglib.Image>> splitImage(String path, {int n = 3 }) async { imglib.Image? image = await decodeAsset(path); List <imglib.Image> pieces = []; int x = 0 , y = 0 ; int width = (image!.width / n).floor(); int height = (image.height / n).floor(); for (int i = 0 ; i < n; i++) { for (int j = 0 ; j < n; j++) { imglib.Image croppedImage = imglib.copyCrop(image, x: x, y: y, width: width, height: height); pieces.add(croppedImage); x += width; } x = 0 ; y += height; } return pieces; } Future<imglib.Image?> decodeAsset(String path) async { final ByteData data = await rootBundle.load(path); final Uint8List bytes = data.buffer.asUint8List(); final imglib.Image? image = imglib.decodeImage(bytes); return image; }
图片显示 1 2 3 4 5 6 7 8 9 10 11 12 13 14 15 16 17 18 19 20 Widget PuzzlePart(imglib.Image img, int index) { return Builder( builder: (BuildContext context) { ObjectKey key = ObjectKey(index); Widget puzzleWidget = Container( key: key, child: Image.memory(imglib.encodeJpg(img)), ); WidgetsBinding.instance!.addPostFrameCallback((timeStamp) { RenderBox renderBox = context.findRenderObject() as RenderBox; Offset center = renderBox.localToGlobal( renderBox.size.center(Offset.zero)); puzzleCenterPositions[key] = center; }); return puzzleWidget; }, ); }
滑动手势识别 GridView参考文章Flutter网格型布局 - GridView篇 - 掘金 (juejin.cn)
1 2 3 4 5 6 7 8 9 10 11 12 13 14 15 GestureDetector( onPanDown: (DragDownDetails details) { lastPositon = details.globalPosition; _firstTouch = true ; }, onPanUpdate: (details) { final curPosition = details.globalPosition; double min = (puzzleCenterPositions[ObjectKey(0 )]! - puzzleCenterPositions[ObjectKey(1 )]!).distance/2 ; if ((curPosition - lastPositon).distance > min) moveJudge(lastPositon, curPosition); }, child: ...略 ), );
图片的移动与合并 我的想法是,首先第一个for循环找到你想拖动的方块,第二个for循环找到你想拖动的位置,最后交互两个方块的位置
这里的关键就这样对min的设置和手势识别中curPosition传入的设置
如果min太大,容易造成移动混乱
如果min太小,容易造成移动敏感度过低
curPosition同理
我的解决方案就是
通过拼图间的距离来调试最佳的min和cur传入条件
1 2 3 4 5 6 7 8 9 10 11 12 13 14 15 16 17 18 19 20 21 void moveJudge(Offset last, Offset cur) { int SIZE = Provider.of<GameMap>(context, listen: false ).SIZE; double min = (puzzleCenterPositions[ObjectKey(0 )]! - puzzleCenterPositions[ObjectKey(1 )]!).distance/1.5 ; if (_firstTouch){ for (int i = 0 ; i < SIZE * SIZE; i++) { if (puzzleCenterPositions[ObjectKey(i)] != null &&(puzzleCenterPositions[ObjectKey(i)]! - last).distance < min) { for (int j = 0 ; j <SIZE*SIZE;j++) { if (puzzleCenterPositions[ObjectKey(j)] != null &&(puzzleCenterPositions[ObjectKey(j)]! - cur).distance < min ) { Provider.of<GameMap>(context, listen: false ).move(i, j); isgameOver = Provider.of<GameMap>(context, listen: false ).checkEnd(SIZE * SIZE); setState(() { _firstTouch = false ; }); } } } } } }
判断游戏结束 每次移动都会调用GameMap的checkEnd方法检查是否游戏结束,若结束蒙版覆盖
1 2 3 4 5 6 7 8 9 10 11 12 13 14 15 16 17 18 19 20 21 22 @override Widget build(BuildContext context) { if (isgameOver) { return Column( children: [ Stack( children: [ _gamePanel(context), _gameReset(context) ], ),DifficultyButton(), ], ); } else { return Column( children: [ _gamePanel(context), DifficultyButton(), ], ); } }
1 2 3 4 5 6 7 8 9 10 11 12 13 14 15 16 17 18 19 20 21 22 23 Widget _gameReset(BuildContext context) { return AspectRatio( aspectRatio: 1.0 , child: Center( child: Column( mainAxisAlignment: MainAxisAlignment.center, children: [ const Text("Game Over" ,style: TextStyle( fontSize: 50 , color: Colors.white70 ),), InkWell( onTap: () { resetGame(); }, child: const Text("Reset" ,style: TextStyle( fontSize: 30 , color: Colors.white70 ),),) ], ), )); }
重新开始游戏 1 2 3 4 5 6 void resetGame() { setState(() { Provider.of<GameMap>(context, listen: false ).init(); isgameOver = false ; }); }
1 2 3 4 5 6 7 8 9 init() { final Future<List <imglib.Image>> _pieces = splitImage(Assets.img1, n : SIZE); _pieces.then((_pieces) { result = List .from(_pieces); pieces = List .from(_pieces); pieces.shuffle(Random()); notifyListeners(); }); }
统一状态管理 privide参考文章
- Flutter Provider状态管理—八种提供者使用分析 - 掘金 (juejin.cn)
- https://flyingstudio.feishu.cn/wiki/E2TSwTtZ9ik92EkCLpHcjAvbnRu?from=from_copylink
首先main方法改为ChangeNotifierProvider组件
1 2 3 4 5 6 7 8 void main() { runApp(ChangeNotifierProvider( create: (_) => GameMap(), child: MaterialApp( home: MyGame(), ) )); }
然后GameMap加上ChangeNotifier
1 2 3 4 5 6 7 8 9 10 11 12 13 14 15 16 17 18 19 20 21 22 23 24 25 26 27 28 29 30 31 32 33 34 35 36 37 38 39 40 41 42 43 44 45 46 47 48 49 50 51 52 class GameMap with ChangeNotifier int SIZE = 3 ; Future<imglib.Image?> _none = decodeAsset(Assets.none); bool firstTouch = false ; List result = []; List pieces = []; int one = 1 ; init() { final Future<List <imglib.Image>> _pieces = splitImage(Assets.img1, n : SIZE); _pieces.then((_pieces) { result = List .from(_pieces); pieces = List .from(_pieces); pieces.shuffle(Random()); notifyListeners(); }); } setTouch() { firstTouch = !firstTouch; notifyListeners(); } checkEnd(int size) { for (int i = 0 ; i < size; i++) { if (result[i] != pieces[i]) { return false ; } } return true ; } imglib.Image get (int i) { if (one == 1 ) { init(); one = 0 ; } try { return pieces[i]; } catch (e) { imglib.Image img = imglib.Image.empty(); return img; } } move(int pre, int next) { imglib.Image pre1 = pieces[pre]; pieces[pre] = pieces[next]; pieces[next] = pre1; } }
在Panel调用GameMap方法的时候加上Provide.of<GameMap>(context, listen:false)


